The Ditty Bag Book
by Frank Rosenow
ISBN 0-914814-05-2 76-4286 623.862 76.1 cop.2
published in 1976 by Sail Books, Inc, 38 Commercial Wharf, Boston, MA
The Tools
Few things on board a boat afford its owner or crew as much satisfaction as
keeping a trim craft in rope, rigging, and sails. To achieve this, the sailor
of yore carried a cotton duck ditty bag with a carefully selected assortment of
tools that enabled him, in substantial measure, to render the same
services to his vessel as a full-blown sailmaker or rigger. The contents of the
ditty bag also served as a darning kit for his wardrobe, and as a source
of materials for practicing decorative knotting and other seafaring arts. As
such objectives are as legitimate and necessary on the cruising or racing
sailboat of today, or can be undertaken for the sheer pleasure of it in some
land-bound nook, I will here make an inventory of the traditional tools—with
some additions prompted by technological advances and the reign of synthetic
materials—that you will find of use in all manner of canvas (including Dacron
and nylon) and rope work on board.\
The Sailmaker/s Bench
There is no denying that the ditty bag concept owes its tools and methodology in
large measure to professional sailmakers and, to a lesser extent, riggers. Let
us therefore begin with a passing glance at a right-handed sailmaker's bench and
see how it is professionally utilized, even though it is unlikely
that this particular tool will fit into your fo'c's'le, let alone the ditty bag.
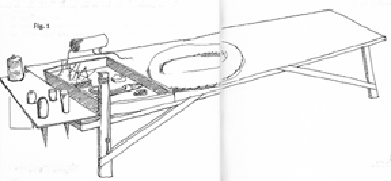
The right-handed sailmaker's bench shown in Fig. 1 (for a left-hander, the bench
ends and work direction would have to be mirrored) is designed mainly
for hand seaming, but since its occupant has a wide selection of tools within
easy reach, the wooden bench can be adapted to every phase of traditional
sailmaking—except panel cutting, which is most conveniently done on the floor.
Benches employed in landlocked lofts are recognized by their straight
legs, while a seagoing bench spreads its legs wide for stability as befits a
nautical character.
The most comfortable height of the bench or the more compact sewing stool (an
alternative for on-board use if fitted with an attachment point for a sailhook
lanyard, a couple of holes for fids, and a- shelf or canvas bag for oddments) of
course will depend on the length of your own legs. I am six feet
tall with legs to match and work comfortably on the 15"-high bench in the
drawing. This may seem low, but there is a reason for it, as we shall see.
But try it out for yourself. You're sitting on a cushion which can slide along
the 6'-long bench. On your right, there's a small, holed shelf to hold
the fid collection, and a pin around which the roll of seaming twine can
revolve. Nestled in just beside you to the right is a 10" X 16" area bordered
by a 1" rim. In this cozy nook, which was referred to as the "cow pasture" when
I was apprenticed, you can leave your palm and needles (stuck into a
soft felt pad where they are readily at hand), along with clew rings, beeswax,
knife, thimbles, and the half-dozen other items you'll want within
arm's reach. At the far outside corner, the pasture is overlooked by a 20"-high
post (actually an extension of one leg) which has a sail-hook and lanyard
twisted round the top. Some benches, notably in the U.S., lack this post, the
sailmaker simply looping the lanyard through a hole, instead.
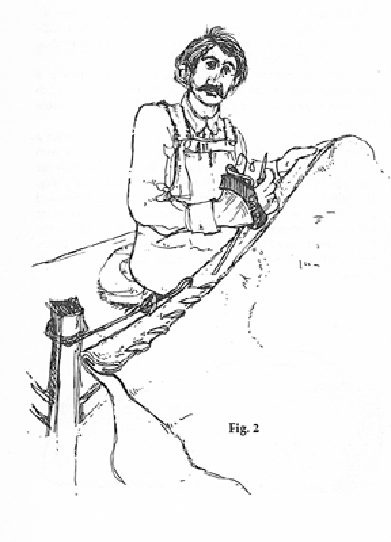
Our man on the job in Fig. 2 demonstrates the hook's use. He is in the
process of flat-seaming, joining two cloth panels which he has tucked in and
overlapped
at the edge to prevent fraying. The sailmaker's hook is inserted at the seam,
enabling him to tension the cloth with his left hand while taking stitches
with his right. The lower cloth is doubled back so that left-handed tension can
be applied near to where the stitches are being taken. The work piece is draped
over his knees and, when positioned correctly, his
upper body is nearly at a right angle to the seam, with stitches being taken in
the vicinity of his right thigh. This is the reason for the low bench—it
elevates the knee to a position where a workpiece resting on it is within
comfortable reach.
If you look closely, you may also be able to see that our sailmaker is using a
roping palm. To heave home a stitch properly, he has let the needle slip
out of the iron and under his ring finger, so that he can take a turn of twine
around the thumb guard and pull tight on the stitch. As the seam progresses,
he'll slide down along the bench on his cushion, unlaying the sailhook lanyard
from the post from time to time to reinsert the hook closer to where he is
stitching, thus lending stability to the work.
Clasp Knife
A sailmaker's or bosun's principal rope and canvas tool—a stubby, broad-bladed
knife—would be carried strapped to his back, where he could reach it with either
hand when aloft. More often than not it was homemade. I recall, for instance, a
fine-looking Norwegian sailor's knife which bears the inscription: "Laget av
seilmaker Halvorsen av en saks i Australia 1900." ("Fashioned in 1900 from a
pair of Australian scissors by sailmaker Halvorsen.")
However, for the purpose of this sample inventory of a functional, present-day
ditty bag, I prefer to break with such homespun tradition and introduce a
smaller, more versatile type of knife. For the first and foremost ditty bag
tool, then, look for a handy clasp knife with a non-corroding blade. I use one
with a 3" blade (Fig. 3) made of hardened Swedish cutting-edge steel which
reaches excellent sharpness. A larger variety (Fig. 4) might have a 4" blade, a
catch to lock the blade in exposed position, and a hole for fitting a lanyard,
and thus be more suitable for general use above and beyond ditty bag chores. All
you really need for canvas and rope work, though, is one high-quality blade and
a comfortable
handle in wood or plastic. A sharp, thin blade will make it a simple matter to
cut sailcloth along warp or fill, or even on the bias if you have a penciled
guideline. When cutting canvas (or, of course, its synthetic counterpart),
spread the workpiece flat on a floor or clear deck space, tensioning the section
to be cut with your left hand and/or knees and elbows. Do not cut from the top
downward, but rather from under the canvas, with the knife blade pointed up.
There are those who use scissors in canvas work, but there is little a really
sharp knife can't do as well, and with greater versatility.
Sharpening Stone
Many of these stones feature a rough side and a smooth side, so that they can
first be used to "rough-sharpen" a dull edge, then turned over and applied to
the task of really producing a fine, relatively burr-free edge. The edge thus
achieved satisfies most needs, but for the stickler who wants to go all the way,
there is soft and hard Arkansas oilstone, quarried from novaculite deposits near
Hot Springs. These super-smooth stones are a delight to handle, and with a final
burnish on the hard stone's jet-black surface deliver the finest edge possible
(short of leather strapping in the old barbershop style). But for the general
purposes of the ditty bag, keeping a stone handy so that you can give the blade
of your knife a quick honing from dull to sharp whenever you feel it lacks bite,
I would settle for a two-sided Carborundum stone measuring at least I1//' X
3"—and preferably a bit more. Novaculite is mainly for "finishing" an already
sharp surface.
To sharpen a knife, hold the blade parallel to one end of the stone and "slice"
across the length of the stone, applying firm but not forced downward pressure
from the heel of the blade to the tip. Do this in only one direction, away from
the body for one side of the blade, and toward the body for the other side. The
blade should be kept at about a 20° angle to the stone (Fig. 5). The knife
should be turned over on alternate strokes or at short intervals so that the
blade is sharpened equally on both sides.
The chore is made easier by a few drops of lubricant on the surface of the
stone, either light, sewing machine type oil or just plain water. If the pores
of the stone still become clogged with fine grit and/or dried oil residue, give
it a thorough wash-out with gasoline.
Seaming Implements
Sailmaker's needles for a' from #4 (extra large) to with Standard Wire Gauging to the thickness of the making is a British tradition ate from England. I
find a fancy fish line knotting, b work on a sailboat, only si have to be
considered.
Sharpening stones come in diverse materials, sizes, and shapes. Today, the
most common variety is a man-made synthetic, usually Carborundum. Many of
these stones feature a rough side and a smooth side, so that they can first
be used to "rough-sharpen" a dull edge, then turned over and applied to the
task of really producing a fine, relatively burr-free edge.
The edge thus achieved satisfies most needs, but for the stickler who wants
to go all the way, there is soft and hard Arkansas oilstone, quarried from
novaculite deposits near Hot Springs. These super-smooth stones are a delight
to handle, and with a final burnish on the hard stone's jet-black surface
deliver the finest edge possible (short of leather strapping in the old
barbershop style). But for the general purposes of the ditty bag, keeping a
stone handy so that you can give the blade of your knife a quick honing from
dull to sharp whenever you feel it lacks bite, I would settle for a two-sided
Carborundum stone measuring at least 1%" X 3"—and preferably a bit more.
Novaculite is mainly for "finishing" an already sharp surface.
To sharpen a knife, hold the blade parallel to one end of the stone and
"slice" across the length of the stone, applying firm but not forced downward
pressure from the heel of the blade to the tip. Do this in only one
direction, away from the body for one side of the blade, and toward the body
for the other side. The blade should be kept at about a 20° angle to the
stone (Fig. 5). The knife should be turned over on alternate strokes or at
short intervals so that the blade is sharpened equally on both sides.
The chore is made easier by a few drops of lubricant on the surface of the
stone, either light, sewing machine type oil or just plain water. If the
pores of the stone still become clogged with fine grit and/or dried oil
residue, give it a thorough wash-out with gasoline.
Seaming Implements Needles
Sailmaker's needles for a variety of canvas work come in sizes from #4 (extra
large) to #18 (extra small), in accordance with Standard Wire Gauge
classification—the number relating to the thickness of the round part of the
needle. Needle-making is a British tradition, and the finest of them still
originate from England. I find a #12 useful for guiding the line in fancy
fishline knotting, but for regular seaming and rope work on a sailboat, only
sizes from #14:/2 through #18 will have to be considered.
A #14% needle (this is the sole half-size in the series) is appropriate for sewn
rings and other heavy-duty seaming, such as sewing a bolt rope to sails.
A #15 functions well in corner stitching through several layers of cloth, and a
#16 for stitching together two medium-weight cloth pieces. For light Dacron or
duck, a # 17 might be best, while nylon spinnaker cloth usually warrants nothing
larger than a #18. But doubtlessly you'll form your own preferences
as you go along.
A pointed, triangular section is invariably found in the cutting portion of the
needle. There are two variations on this characteristic. The "Short Square" or "Lolley"
(after English needlesmith William Lolley) is designed
for use with round, firm-lay twine and consequently has a rather pronounced eye
and a comparatively large cutting triangle to create enough of an opening
for the threaded eye to pass through without difficulty (Fig. 6). This needle is
often selected for decorative stitching, which firm twine makes more
distinctive.
"Long Square" needles have a finer taper or "reduced edge" in the cutting
section and feature an extended shank that ends in a well integrated eye (Fig.
7). This type of needle is excellent for pre-waxed or other flat or soft-lay
twine, which pulls down neatly around the eye and does not require a hole much
larger than the diameter of the shank to pass through.
For general seaming work, to my mind the best combination is a reduced-edge
needle with soft or flat twine which flows through the canvas with a minimum
of resistance. I also prefer the Long Square from the point of view that the
long shank seems to further a quick, accurate aim when spacing the stitching.
Needles are usually distributed in lots of 25 wrapped up in brown paper
envelopes (Fig. 8) with an inner wax paper lining to prevent moisture from
entering. Needle rust is a problem, especially on shipboard. The needles are
made of polished, cast steel and moisture affects them almost immediately. If
you allow any surface blemish to develop, the needle will of course become more
difficult to sew with, on account of the increased friction. Another storage
problem is that the fine points of the needles are easily blunted if knocked
around.
The sailor of old usually kept his needle-collection in a horn or tube filled
with evil-smelling tallow. I would rather recommend smearing an empty tobacco
box (Fig. 9) or some-such tin container with Vaseline and dropping in the
needles with an extra, individual dab of the stuff. The Vaseline both prevents
the needles from rusting and restrains their movements so as to preserve the
points.
Stock up with at least half a dozen of each size you want to use. These little
devils have a predictable tendency to get lost.
Palm
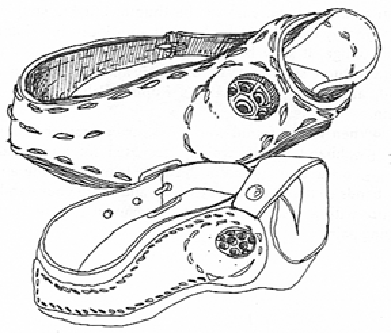
The common, Anglo-American style of hand-seaming palm (Fig. 10, foreground)
consists of a leather sling that is strapped around one's working hand,
performing the same function as a seamstress's thimble when entering a needle.
The butt of the threaded needle is placed within the circular, raised
"iron" section to brace against one of a number of indentations provided for
this purpose. A seaming palm may have more than a dozen small, shallow
indentations in its iron to take fine needles.
The roping palm with its thumb guard (Fig. 10, background), which has been
recommended in this book's introduction for its versatility, has only seven,
but more substantial, indentations. These do excellently in holding firmly the
gamut of needle sizes and, since a roping palm is far hardier than a
seaming palm, it is certainly to be preferred.
To prevent injury from an accidental slip of the needle, palms have a raised
buttress around the iron, and a pigskin "plate" stitched to the outside of
the leather sling. In a first-class palm, the iron's surface will be
perpendicular to the natural thrust of the needle to insure as safe an operation
as possible.
The best insurance, however, is to hold the needle correctly to begin with.
Steer it into one of the indentations in the iron with your ring finger and
make sure it remains in place by keeping the fingertip on it. Use the middle
fingertip and thumb to direct the needle, and the tip of the index finger as
sort of an advance scout, probing the canvas, making directional readjustments
to the tip of the needle, or bracing the canvas against the push of the needle.
You have to let go this excellent hold every time you
take a stitch, of course, but it should be resumed automatically as soon as the
needle is pulled through. The exception is when you want to wind the
twine around the thumb guard of a roping palm to heave tight on a stitch, in
which case the needle is held under the right-hand ring finger while the pull
is made.
Many of the sailmaker's palms commercially offered today—particularly seaming
palms—are not up to the old-time standard, consisting as they do of a flimsy
hunk of leather (or even plastic!) with a piece of tin haphazardly sewn on in
lieu of a bona fide iron. So when you shop for a palm, look for sturdy leather
construction. The leather in a properly-made roping palm will be %" thick, and
the plate at least half that in addition.
A well-made palm is a prized possession and a pleasure to work with, and ought
not to be underrated. The important thing when fitting a palm is that it doesn't
pinch at any place, such as around the base of the thumb, but fits snugly and
comfortably over the entire hand. If your local ship chandlery can't oblige, it
may be worthwhile to write to a reputable manufacturer such as Wm. Smith & Son
of Redditch, England, and order a Sailmaker's Roping Palm directly from them.
When you've found your ideal partner, rather than using the watchband buckle
usually provided for adjustment as shown in the seaming palm drawing, trim down
the ends of the bands so that they don't overlap and chafe your hand, and secure
with a neat, seamanlike, permanent seizing as in the roping palm.
The breaking-in of a new palm will take place over a period of time. Simply use
it to the extent that your own sweat, or hand moisture if you prefer, softens it
up. Eventually it will mold itself, then harden to an exact fit. If you obtain a
second-hand palm, or one which is generally a sorry fit, you may want to try
soaking the palm for a few hours in lukewarm water to make it more pliable and
thus more likely to readjust itself to your hand. I would hesitate to recommend
this with a really old palm, however, since the plate may have been secured with
animal glue. This will tend to run during a soaking, impairing the homogeneity
of the palm as well as discoloring it.
If treated with care and kept in a dry place, a good palm properly broken in
will be a joy forever. When I called by to see Everett Lohnes at his Lunenburg,
Nova Scotia, sail loft one September day, he pulled out half-a-dozen roping
palms which had belonged to sailmakers working a lifetime in that once busy
sailing port. One palm had been badly chipped around its iron, but the others
all were in perfect order, with smooth pigskin plates gleaming more richly than
the autumn sunlight in the harbor. And my own favorite palm was graciously
handed on to me long ago by an older colleague at his retirement.
Beeswax
If you've ever ventured into the glades of Sherwood Forest with Pyle as your
guide, you may remember catching a glimpse of Little John in the shade of the
greenwood tree, "rolling a stout bow string from long strands of hempen thread
... and rolling the cord upon his thigh." As he rubbed his new-made string with
yellow beeswax to fix the twist, Robin Hood, who had been gazing ruminatively at
his chief steward's doings, gave voice to an idea. The adventure that ensues is
the one where Little John, in the guise of a holy friar, makes bold to pick up
three pretty lasses at the Tuxford crossroads but I have to break off here to
point rather to Little John's prowess with the beeswax. His procedure, of waxing
doubled twine, then twisting it, and waxing it again to keep the twist in and
stabilize the cordage, is exactly how you should prepare a length of twine for
general seaming (for the twine itself, see next entry). The beeswax is a
fragrant pale yellow or amber commodity, which you can track down these days at
ship chandlers, sailmakers, and (in Europe at least) apothecaries.
Begin by taking a fathom of twine from your spool and threading it through a
needle. Double the twine (you now will have a 3' length) and, with a lump of
beeswax in your left hand, wax the twine by pulling it hard against the lump
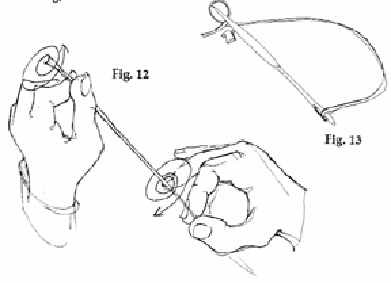
Then twist the twine, making a counterclockwise turn with your left hand, and
a clockwise one with your right (Fig.12). A second and third waxing will keep
the twist in and help the twine to flow smoothly through canvas without
tangling.
If you require a stopper knot after threading and twisting the twine to prevent
the end from working loose as the seaming begins, make a loop as
shown in Fig. 13, pinch the twine juncture (arrow) between thumb and forefinger,
and pull the needle through. It is much better to sew in the end
as you go along, however.
Twine
Righthand twist, pre-waxed polyester is the flat, pliable twine most commonly
used for hand seaming. It is strong and very satisfactory to work with. But
for jobs with an ornamental aspect, such as sewn rings, the only real
alternative—round-lay polyester—will stand out much more distinctly, both on
account of its extra body and because of the more solidly white color.
Twine of the pre-waxed variety supposedly can be used without hand waxing, but
if you apply the customary rubdown to it previously discussed, you will
find that it holds the twist much better.
If you do a significant amount of hand seaming, buy your twine in a large spool
rather than in some overpriced smaller package.
In addition to multipurpose hand-seaming twine, you will want a spool of fine
polyester-and-cotton machine thread. Try to obtain the grade used by
sailmakers for light sail or spinnaker seams. The primary use for this fine but
strong thread is for whipping wire, where it will give a tight and hard
surface after waxing.
Sailmaker's Hook
As mentioned earlier, a canvas-piercing hook is indispensable in that it
provides an "extra hand" in any kind of hand-seaming work.
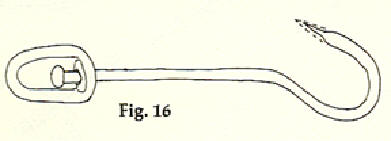
The most commonly used model consists of a 3" piece of round steel which has a
bronze swivel at one end for a spliced-in lanyard, and a pointed hook at
the other for insertion in the canvas (Fig. 16).
However, the point commercially supplied serves very poorly in this context,
since it is on the blunt side and difficult to press into the canvas. If really
drawn to a firm hold, it leaves a gaping hole or, quite possibly, a
rip.
To prevent such mishaps, you must sharpen the ends of these hooks with a file as
shown in the sketch (dotted line represents the original shape of the
point). The sharp end then allows the hook to enter canvas smoothly, while the
bulge prevents it from entering so far as to make a big hole or rip.
Prickers, Spikes and Fids
Spikes of iron, whale bone, or hardwood were among the earliest canvas- and
rope-working tools. They were used to pierce canvas for sewing and to pry
apart the strands of a rope for splicing. In time, these primitive tools were
developed into highly specialized instruments.
Piercing tools known as prickers (round or square section) and stabbers (with
the superior three-square section) have become sharp and effective but, for
the purpose of the ditty bag, rather cumbersome to carry. An obvious substitute
is our friend, the sharp knife. Pierce a star-shaped hole by taking three
strokes to the center, pry it open with a fid, and cut off the tatters with the
knife.
If you need to make a lot of holes, by far the best instrument is a regular hole
punch which cuts a neat, circular hole.
For piercing small holes—to make way for the needle in repairing boating
mocassins, for example (but even then, sewing through the rubber sole is
murderous)—I find an awl of the kind used in leather work the handiest tool. The
sharp end of this tool, as with any such pointed implement, should be protected
with a cork.
Rings Sewn rings and grommets
An expertly sewn ring is a thing of beauty, far superior in appearance, if not
necessarily in strength, to the hydraulically pressed eyelets that the modern
sail factory has to pass off as clew rings. Learning how to sew in a ring also
has the advantage that it can be done afloat if it becomes necessary to replace
a torn out clew or to provide an emergency reef point.
The proper fitting of a bronze ring requires some portable tooling, to wit: a
hole punch, a die, and a puncher (Fig. 32). To affix a ring, start by punching a
hole ten percent smaller than the diameter of the ring to be used. Thread a
needle with a fathom of twine, double and wax.
Now comes the difficult part of stitching on the ring without distorting or
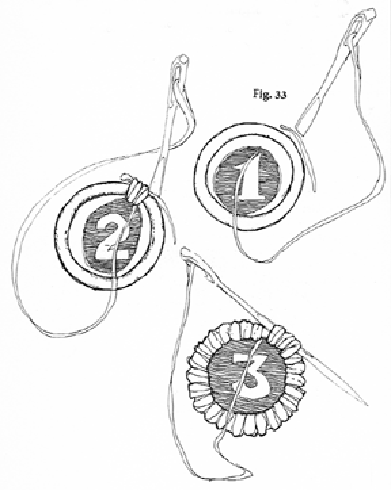
misaligning the hole. The common and The trick here is to bring the inside of
the ring up flush with the very edge of the hole—at a point directly opposite to
where the first stitch is taken (Fig. 33:1). Fix the ring in this position
with your left thumb and forefinger as you lock the standing end of the twine
and start taking stitches with your right hand (Fig. 33:2).
Keeping a firm hold on the ring and canvas opposite to where stitches are taken,
continue to stitch just outside the ring, carefully spacing each needle entry
until the whole ring is covered sun-ray style, and the last stitch can be buried
der three or more of the initial stitches (Fig. 33:3).
Even spacing, apart from its visual value, will provide the best cushion as the
puncher and die are now brought together from opposite sides over the sewn-up
ring (Fig. 34). A few smart blows with a hammer or mallet are enough to force
the puncher into the die, thus bending round a thimble poised on the puncher to
encircle and reinforce the ring, partially covering the stitching.
Restraint must be exercised with the mallet blows to prevent the sharp edge of
the now-bent thimble from digging into the twine and parting it. (This, of
course, would very considerably lessen the holding power of the ring.) Also, the
inside perimeter of the die is very easily chipped by excess force.
It's a good idea to carry some medium-sized rings as ditty bag companions even
if you don't have a die and puncher aboard. The rings can be sewn in per above
as emergency clew rings, omitting the reinforcing thimble.
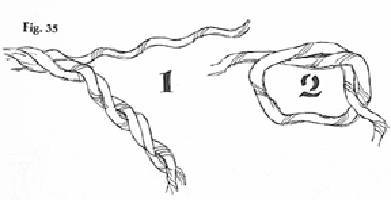
But short of a ring, you can still fashion a usable eye with only palm, needle,
and thread. Unlay one strand of laid rope (Fig. 35:1), preferably from
three-strand polyester for strength—though, particularly to practice
with, monofilament polythene is good, too. Cut the strand at a length equal to
three times the circumference of the proposed eye plus two or three inches for
finishing. Make a half-knot on the cut-off strand and draw it to the
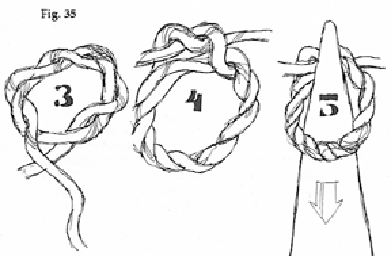
predetermined dimensions of the eye (Fig. 35:2). Double the strand while
matching the twist (Fig. 35:3) and then, similarly, triple it. Finish with an
overhand knot where the two ends meet (Fig. 35:4).
Even an expertly laid rope grommet may not look symmetrical at this stage. To
improve it, slip it over the end of a fid and tap it down gently, as far as
it will go (Fig. 35:5, dotted line). See to it that the strand is uniformly
tensioned all around before cutting the ends. The cordage grommet will be sewn
on in exactly the same fashion as a bronze ring. Such a grommet will not be as
strong as a ring, and will distort considerably. But for a jury-rigged clew, it
will be perfectly sound.
Tape
The most useful tape for general wire serving and whipping work is no doubt the
common plastic tape which can be stretched to fit tight over almost
anything. But for serving a wire splice bristling with fish hooks, I prefer
insulating tape of the kind that is sticky on both sides and built up on a
fabric base. The texture makes it "fill" much better and absorb the hooks.
An altogether different type of tape—adhesive-backed nylon spinnaker cloth—is
commonly recommended for use in emergency sail repair. I would as soon use
less expensive broad masking tape, which holds on as well. However, generally
speaking, I would much rather stitch than tape a rip.
A really generally useful tape is Dacron webbing, which is dandy for
applications anywhere flexible, concentrated strength is needed.
Canvas
As with rope, synthetic fibers have elbowed out organic ones in the manufacture
of sailcloth proper. But since suppleness and heft is still desirable in canvas
work, cotton fibers can perform yeoman service if you want cloth for a ditty bag
or genuine canvas hammock. Besides, light cotton duck is much more pleasant to
sew than corresponding, harder, Dacron weave.
Dacron or Terylene cloth (the trade name for the polyester varies with the
country of origin) comes in a wide variety of surface finishes—from soft or
fairly soft unresinated weaves, to hard resinated sheets.
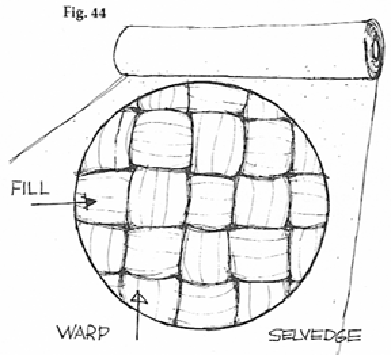
The smooth edge on either side of sailcloth panels is called selvedge.
Nylon spinnaker cloth, on account of its flightiness and stretch, is unsuitable
for hand seaming, but emergency repairs in it are quite feasible.
Just about all synthetic and cotton canvas used at sea is woven on commercial
looms where the longitudinal warp yarns (single or doubled) jump up and down to
admit the transverse fill (Fig. 44). When cutting canvas, try to cut cleanly
either along the warp, the fill, or the diagonal (bias). When cutting
to size with cotton, allow at least I" extra per foot of material for shrinkage.
The stretch characteristics of sailcloth depend on whether the stress is
directed along either threadline (less stretch) or else wise (more stretch). It
is therefore important that a patch is matched as closely as possible not only
to the existing cloth in terms of finish and weight, but also to the direction
of the yarns. Permanent repairs to performance sails should, of course, be
machine sewn to make the patching as discreet as possible.
The Processes
Perhaps the most gratifying aspect of sailing is that, despite advances in
materials and technology, its basics remain eternal. This is very much the case
with the ditty bag and its contents, which for centuries have survived virtually
intact. One reason is that from generation to generation, traditional
boat-keeping practices have proved both functional and attractive. Indeed, if
there is anything to be said in their disfavor, it is only that a certain amount
of skill and knowledge is required—which is not always the case with more modern
conveniences. Yet nothing says quite so much about kinship with sailboats and
the sea as the amount of extra effort the operator of a vessel has made to do
things right.
In the quest of learning to "do things right," we will begin with the essentials
of hand seaming. When mastered, these techniques will enable you to tackle any
canvas work with confidence, building up speed and a steady hand as you go
along. One of my early mentors perfected his skills hand-seaming huge tarpaulins
in W.W. II. But we'll do well first to turn to a smaller and surely more
interesting pursuit: that of making the ditty bag itself. And having run the
gamut of plain and fancy stitching, what better opportunity to finish off our
bag by introducing a few other seamanlike procedures that will employ the tools
to be put inside?
Making a Ditty Bag
The ditty bag (or its larger relative, the sea bag) used to be the first seaming
job an apprentice under sail would tackle. All the seams in nautical practice
were incorporated in fashioning these bags and the job, if properly learned,
prepared the novice for handling any seaming chore with complete confidence. It
therefore strikes me as the ideal project with which to start this section.
Besides, several other touches will be introduced which put a bit of cream on
it:
Six or more grommets have to be sewn into the hem of the bag to accommodate
lanyard splicings that come together in an eye at the top so the bag can be
suspended from a peg, or handled aloft with the top open to give easy access to
the tools. To close the bag, a turk's head, that most beloved of ornamental
knots, can be knotted below the eye for the utilitarian purpose of sliding up
and down on the bunched lanyards to open or close the bag at a touch of the
owner's hand. Moreover, in days of yore, the eye, and the handle pertaining to
it, were covered with natty rope work as an individualistic touch. The seams
were piped with brightly colored yarn to the same purpose and, among deep-sea
sailors with plenty of time on their hands, it was common practice to tuck a
strip of coarse canvas under the top selvedge seam, so that the warp yarns could
be pulled out and the remaining fill yarns knotted into some intricate design
right around the bag.
Seams
To put together the ditty bag, we'll execute the flat seam, round seam, and
tabling, with a later aside about running and roping stitches thrown in for good
measure. These happen to comprise all the basic stitches a hand-seaming sailor
uses. The majority never even feel the need to venture beyond the flat and the
round seam, which gives some idea of the versatility of these two seams. But a
variety of seams is worth at least a brief mention.
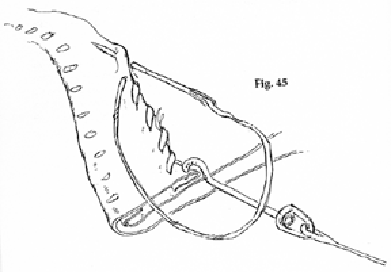
A flat seam (Fig. 45) is made from right to left or, in the vernacular (assuming
you're bench seaming), "away from the hook." The common variety—the double flat
seam (usually referred to simply as flat seam)—is used to join cloth pieces
which are overlapped and turned in at the edges to prevent fraying (a precaution
which is not necessary when joining selvedges or Dacron cloth cut with a
hot-knife). The drawing shows the work turned over, and the second seam being
put in.
To visualize better the seaming process, you may want to turn back to Fig. 2.
There, the first flat seam is being put in, with the work stretched out flat
between the sail hook and the seamer's left hand. To enable him to stretch the
upper and lower cloth adequately, the work has been doubled back to allow a
firm, left-hand hold, but the actual stitch area is flat, thus distinguishing it
from the more common round seam. As in virtually all hand seaming, the workpiece
rests over the knees.
A flat seam applied singly has application only in tabling; that is, when
turning over the edge of canvas for reinforcement and securing the doubled hem
with a stitch. When used for this purpose, the flat seam is referred to simply
as tabling.
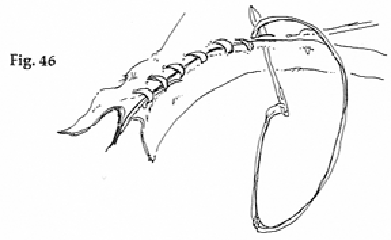
The round seam (Fig. 46) is traditionally made from left to right, or "towards
the hook," and the bag, or whatever you're working with, is turned inside out
and the cloth is bent back in the seam area, so that the stitch is taken through
a protruding four-layer edge disappear when the work is returned right side to.
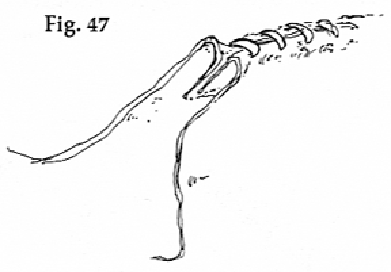
You can use round seam on the outside, too, with the ragged edges turned in, but
this is less common and referred to as single last round seam (Fig. 47).
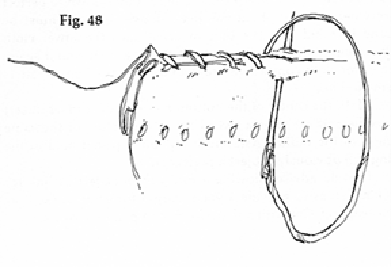
Double last, another fairly rare stitch, denotes two round seams which are used to join canvas folded as for flat seaming (Fig. 48).
Endless argument once centered on whether the double flat or double last round
seam was the better way of joining sailcloth panels. Suffice it to say that for
seaming strength, you can rely on a round seam because of the tight stitching it
encourages while, for general seaming of overlapping canvas, a double flat seam
is better since the joint comes out flat and neat, without need for rubbing down
unsightly humps. The best rule of thumb I can think of is to use a round seam
for single seaming in utilitarian sewing, and a flat seam for double seams such
as in sail patching.
Nothing marks the accomplished palm-and-needle man better than a well-drawn,
uniformly spaced, row of stitching. Although essentially the same stitch, note
that the flat seam is stitched obliquely to form a zig-zag pattern, while the
round seam is taken more perpendicular to the work. The space reckoning is
usually calculated per needle length (figuring the length of a needle at 2l/2")-
Seven to nine stitches per needle length is the minimum required for a good
flat-seaming job. A round seam can be spaced more tightly, with a needle count
of up to 15, and no less than nine.
When joining canvas, it is a good idea to match up the two pieces before
starting the seam, and make a horizontal pencil mark across every other inch or
so. By keeping an eye on these marks as you go along, you'll be able to check
that you're aligning the two pieces evenly and correctly against one another.
It is also important to crease the work adequately. This process will be
discussed shortly.
Cutting Material to Size
For a pleasing end result, it is vital that the bag material (cotton duck canvas
of medium weight is probably the best choice) be marked up neatly and correctly
at the beginning. This should be done on the whole cloth, as the smaller the
piece, the less stability.
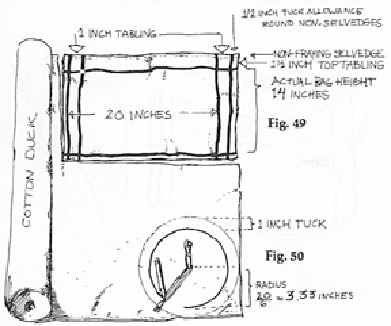
With an ordinary lead pencil, draw in the dimensions shown in Fig. 49, which
will yield a bag 14" high by 20" in circumference. The top of the bag is toward
the selvedge. Allow for a 1/2" tucking strip around the three other sides, as
these are likely to present fraying problems. The two 1" strips are designed to
overlap when sewing the bag together. A iy2" strip at the top of the bag will be
turned in to reinforce the hem.
To lay out the bottom piece, divide the circumference by six, which will give
the approximate radius, in this instance 3y3". Using this short-cut arithmetic,
you'll err on the large side by about 5 percent, but you'll want a bottom piece
which is a bit oversized to start with and only comes down to perfect size when
the last stitch has been drawn tight. (It must be borne in mind that the bottom
constitutes the lower cloth when being joined to the body of the bag with round
seam; the lower cloth contracts more than the upper when a seam is being put
in.)
Mark the center of the bottom piece on the canvas, insert a needle and use it as
a swivel for a twine sling of the same length as the radius. As seen in Fig. 50,
a pencil held in the sling will obviously project a perfect circle.
I would advise allowing a full inch outside this line for tucking, so as to
provide a wide margin for error in the bottom seaming. Cut with a sharp knife or
a pair of scissors.
Flat and Round Seams
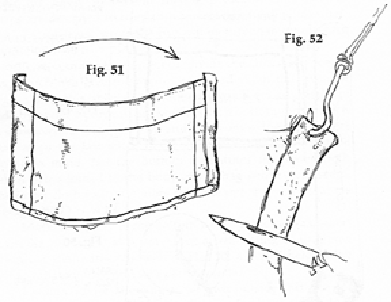
Fold the 1/2" tucks on either side of the body piece in opposite directions as
shown in Fig. 51. The crease lines should be emphasized by rubbing. To this end,
hook up the upper right-hand corner of the canvas piece on the sail hook and
place it on your right knee, rubbing in a sharp crease with the back of your
knife blade as pictured in Fig. 52. Start by merely fixing the crease line with
short strokes of the blade taken towards you, then rub in a hard, permanent
crease by long, vigorous strokes in the same direction. When both tucks have
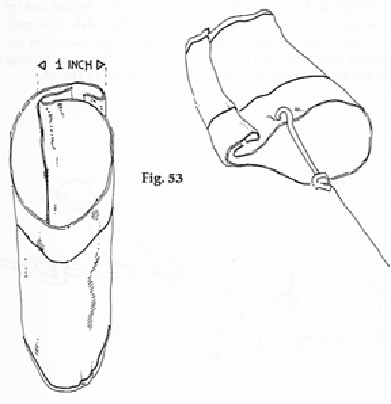
been rubbed down, the body of the bag is shaped into a cylinder (arrow, Fig.
51). The 1" ta-blings should now overlap as in Fig. 53.
Select a #15 or #16 needle, threaded with twine waxed and twisted in the
described fashion. Commence the first flat seam with your torso a quarter turn
to the left and your right elbow near your right hip, workpiece over your knees.
The canvas is held taut between your left hand and the sail hook (Fig. 54).
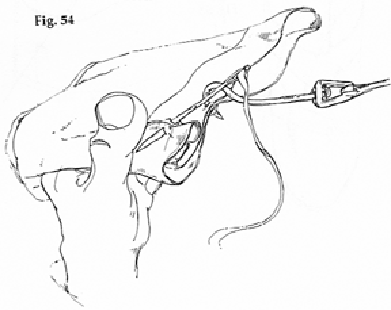
Since the workpiece is doubled back on your knee, one risks pushing down too
much on a stitch and inadvertently sewing the body of the bag into a figure
eight. The professional practice has always been to push the needle down through
both canvas layers. The needle is then withdrawn with some tension retained.
When the tip leaves the lower canvas, a quite audible "tic!" announces that
you're on the safe side and can proceed to guide the needle forward and up
through the upper canvas layers to take the stitch. This may be long in telling
but, with practice, the whole maneuver occupies only a fraction of a second.
Continue the seam, locking in the standing part as you go along, as shown in
Fig. 55.
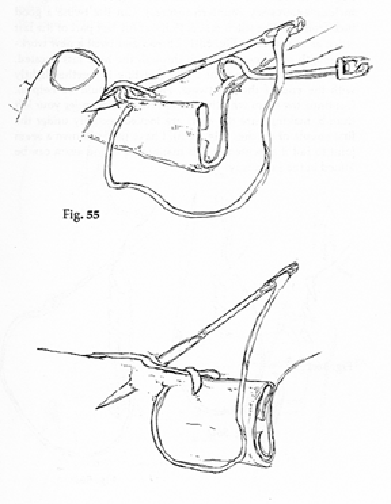
Now let's assume the half-fathom of twine threatens to run out before you reach
the end of the first seam (unlikely, but the instructions of this particular bag
of tricks ought to include emergency countermeasures). Cut the twine a good inch
from the last stitch taken. Pull out the last part of the last stitch as
indicated in Fig. 56:1.
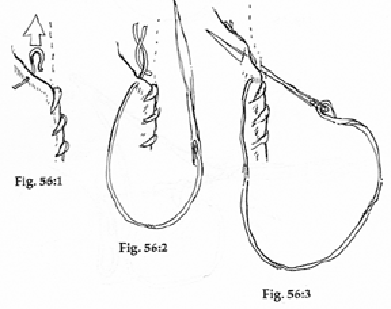
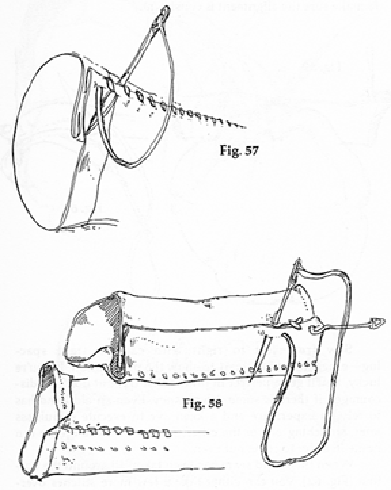
Thread and twist a new working length of twine and stitch through the hole just vacated. Here too, leave an inch of twine, twisting it together lightly with the end of the old twine. Fig. 56:2 should be helpful. Continue the seam with the twisted twine end under your left thumb, making sure the ends are locked securely under the first couple of stitches (Fig. 56:3). I have never known a seam joint to fail if executed in this manner. A round seam can be joined in the same way. When you get to the end of the seam, lock the end with a couple of back stitches as in Fig. 57, and cut. Turn the bag inside-out and proceed with a flat seam which is the twin of the one on the other side. Fig. 58 shows the start. When you get to the end of the seam, stitch back to lock the end just as in Fig. 57, before cutting.
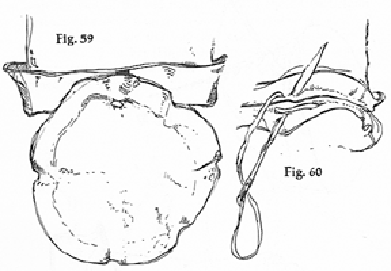
With the bag still inside-out, turn up the l/2"-wide bottom strip as shown in
the upper part of Fig. 59, rubbing down the edge with the back of your knife
blade. Match it to the inner pencil circle on the bottom piece. Begin a round
seam, locking in the end (Fig. 60). Before starting the stitching, you might put
in a couple of "stoppers" (one is shown in Fig. 59) to make sure the alignment
is consistent.
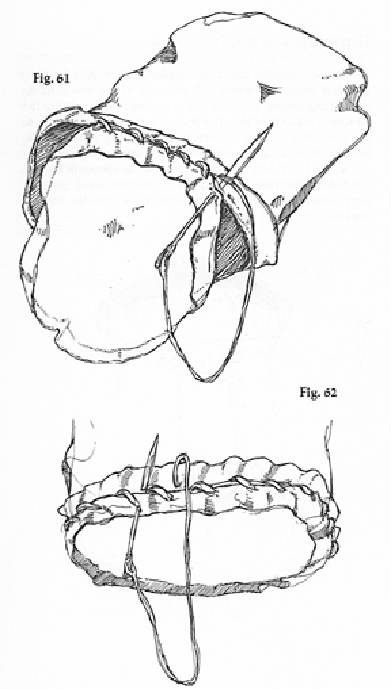
Sew from left to right with careful, tight spacing—exaggerated in Fig. 61 to
show the progression. If you're lucky, you'll get a perfect fit on the first
try, but don't be discouraged if there is some discrepancy. Even an old hand has
to rely on experience and a keen eye to execute a faultless joint, stretching
one or the other cloths a bit extra on the run home in order to come out even.
When the round seam has been taken all around the bottom (Fig. 62), you can
either take a few more stitches overlapping the ones initially taken, or stitch
back as shown in the drawing. Cut the twine.
Running and Roping Seams
An alternative to the conventional fitting of the ditty bag bottom just
described, which will allow us to get into running and roping seams, is to fit a
laid rope ring (see Fig. 35) to the bottom. To facilitate this, the bottom piece
has to be sewn to the body in a different manner, with the bag rightside-out.
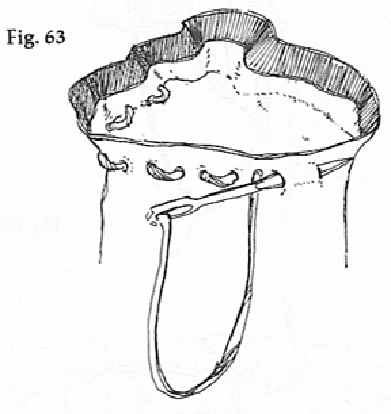
Reduce the tucking allowance to l/2" on the bottom piece. Insert it a full inch
into the body of the bag as shown in Fig. 63. Guided by the inner mark-up on the
bottom piece, put in a simple over-and-under running stitch to join it to the
body of the bag.
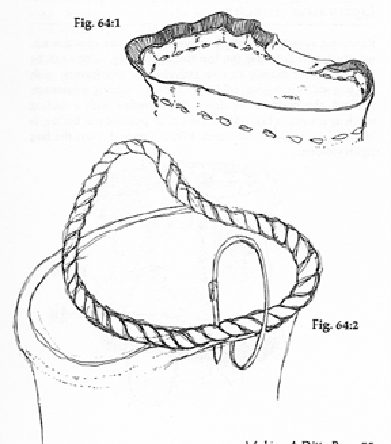
As in Fig. 64:1, fold the rim of the bag inward, rubbing it down firmly. The
ring will lay atop this fold. Make the ring from three-strand %" cordage to the
inside dimension of the bottom perimeter. Now the roping seam is employed. A
good way to conceive of the intent of this stitch is that it sews the rope to
the canvas, rather than the other way around. Direct a slightly blunt #14y2
needle precisely into the score of the rope and let it emerge just inside the
rim of the bag bottom opposite the next score, in effect stitching under one
strand as illustrated by Fig. 64:2. Pull tight firmly on every stitch to force
the canvas into the lay of the rope. Be sure to space the stitches so that the
twine is neatly buried in the consecutive scores. Sew all round and cut the
twine.
Having gained proficiency with the roping stitch, you'll be able to use it as a
stronger alternative to tabling wherever a canvas edge needs reinforcement.
Simply tuck over the edge, and join it to suitable cordage with a stitch as per
the above.
If you're called on to rope a sail, or to replace damaged bolt rope, proceed in
the same fashion, seaming from left to right, with the rope coil laid out
completely free of twist on your right-hand side. The amount of tautness in the
rope should not be overdone, since a slightly puckered luff, combined with an
appropriately elastic bolt rope, gives the necessary leeway for trim and
stretch.
Decorative Touches
Returning now to the ditty bag bottom with the round seam, we must next consider
the top rim of the bag, which can be finished either plainly or decoratively.
For the former, with the bag still inside-out, fold over the 1%" tabling
allowance, and rub the crease. Sew down the selvedge with a tabling stitch as
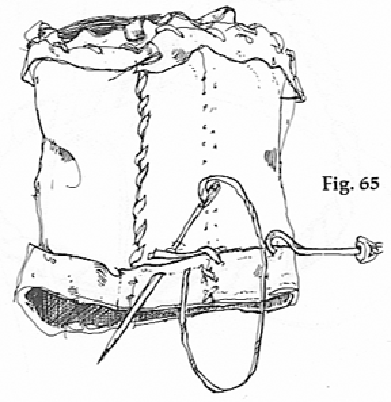
shown in Fig. 65. This seam, as pointed out before, is identical to a single
flat seam. When finished, turn the bag rightside-out.
If, on the other hand, you'd like some decorative tassel rather than a plain tucked rim, turn the work right side-to and crease the I1//' tabling outward, rather than inward. Under this run a 7" strip of coarse canvas. With a tabling stitch, sew this strip, the selvedge, and the inner part of the bag together. Fig. 66 shows the work in an advanced stage, where the 7" canvas strip has been slit at equal intervals in the course of becoming tassel.
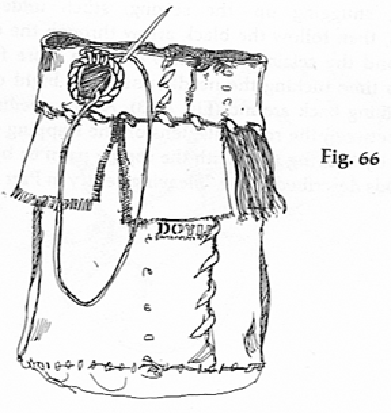
The canvas strip should be cut out such that the warp yarns run horizontally
around the bag, since these are easier to pull out than the fill yarns. With
only the fill yarns remaining, any decorative knotting design can be effected,
the more common method being macramé or square-knotting. But before attacking
the warp yarns, remove at least half a dozen fill yarns from each of the slit
edges. This will reveal a finger hold when pulling at the warps.
For added personal touch, you may want to affix laid cordage rings or "grommets"
to attach a lanyard to. Six of these should be punched out with even spacing
along the rim. The buttonholing stitch shown in Fig. 66 will put a natty fringe
around the grommets if used in lieu of the previously described clew ring
stitch. For additional distinction, redouble your twine to make it four-ply.
This thicker twine will call for at least a #15 needle.
The Lanyard
We can now apply some of the processes described earlier, and learn some
valuable new ones, in the making of a lanyard for carrying our bag. Secure a 36"
length of :/2" or 3/4" twist and middle it—that is, double it in two. Put a flat
seizing on the eye thus formed.
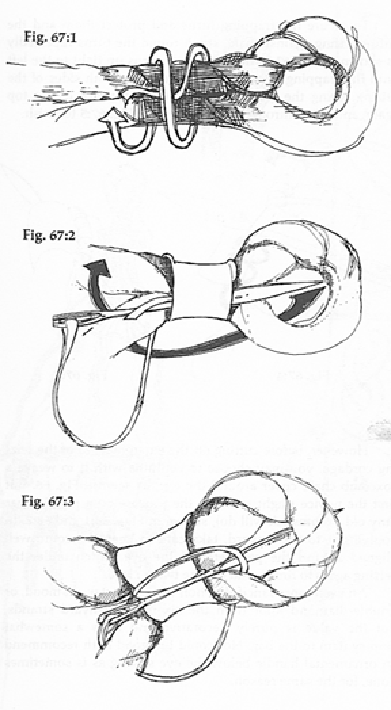
Fig. 67 shows the techniques. Take a full seaming length of twine and, on a #12
to #14:/2 needle, thread and twist as usual. Place the standing part along the
doubled rope as displayed in Fig. 67:1 and commence taking turns. (For an eye
demanding more strength, such as might be used for rigging purposes, the two
ropes should first be stitched together firmly, but in this instance there is no
real need.)
Keep adding turns, heaving tight at every other turn, until the seizing is as
long as it is wide (Fig. 67:2). For frap-ping—i.e., snugging up—the seizing,
stitch under it as illustrated, then follow the black arrow through the eye and
back around the seizing. Take two or three more frapping turns, this time
tucking the needle under the bight of twine before coming back around (Fig.
67:3). As the needle comes back up between the rope tails, tension the frapping
turns of the twine by heaving tight with the roping palm or by one of the
methods described in the "Heaving" entry in Part I.
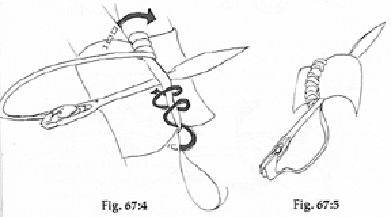
To secure the frapping turns and protect them and the entire seizing against
chafe, stitch round the turns repeatedly as shown in Fig. 67:4, and pull these
turns up tight to the left until the frapping is completely covered on both
sides of the seizing. Bring the working end through the eye to the top again,
and stitch through the seizing as in Fig. 67:5 to finish.
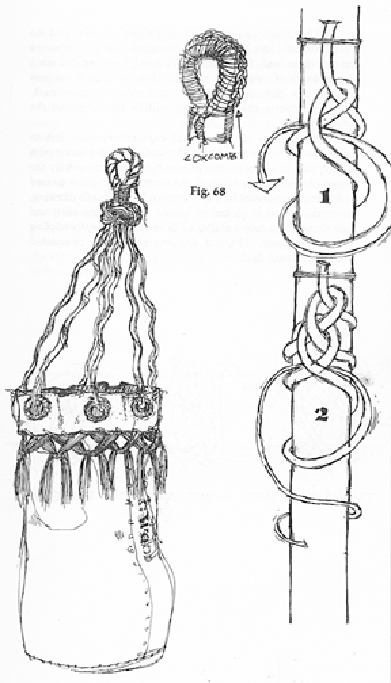
However, before cutting off the emerging end of the seizing cordage, you may
choose to continue with it to weave a coxcomb chafe cover around the eye, as
seen in Fig. 68. But first the novice might rehearse the process on a practice
bar (any old broomstick will do), shown in Figs. 68:1 and 68:2. In applying it
to the lanyard, take care to keep the comb well aligned around the perimeter of
the eye. Stitch under the seizing again to finish, and cut the twine close.
An even more fanciful option is to lay a star, diamond, or double-diamond knot
from the six unlaid lanyard strands, but the value is purely decorative and adds
a somewhat clumsy item to the bag. Nor could I in good faith recommend an
ornamental handle below the eye seizing as is sometimes done, for the same
reason.
But I definitely advocate slinging a turk's head round the un-laid strands, just
below the flat seizing. We will fashion a simple, three-lead, five-bight turk's
head, knotting it from a single length of cordage as shown in Fig. 69. (Again
the procedures are displayed on a broom handle or some such, though of course
the actual knot will be taken around the lanyard itself.)
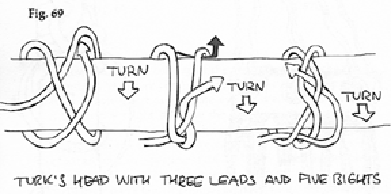
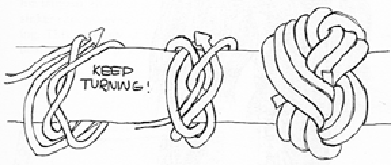
The drawings should be self-explanatory from left to right. The necessity of
rotating the work a good quarter-turn at each step to allow for the proper tucks
is indicated by the arrows. A few further hints: In the center, one bight is
passed under another (shown by black arrow). In the fourth drawing, the working
end is tucked in beside the standing part, and from there it's simply a matter
of doubling and finally tripling the standing part. The last drawing shows the
completed knot, its ends cut flush. As with any turk's head, pass the earlier
leads loosely, since even then by the time the third lead is underway the knot
will have tightened to the extent where the last few tucks will have to be made
with assistance of a Swedish fid. Additionally, moderation should be exercised
for this particular application so that the completed head will slide freely
along the bunched lanyard strands. Incidentally, any knot in this decorative
category may be enhanced by later painting or inking one lead in a contrasting
color.
But let's not forget the other end of those lanyard strands, which remain to be
secured to the six rope grom-mets. To do this, measure off the last 3" of each
strand end, and tuck it through the hole and back up against the standing part.
Seize over firmly with a threaded length of twine in the manner shown in Fig. 76
a few pages hence. Arranged thus, the ditty bag can be taken aloft and suspended
open, with tools handy.